Awesome Animals returns

The next event, to be held in early October, is a repeat of a very successful theme – Awesome Animals. Birds, bats, insects and large mammals will rule the day.

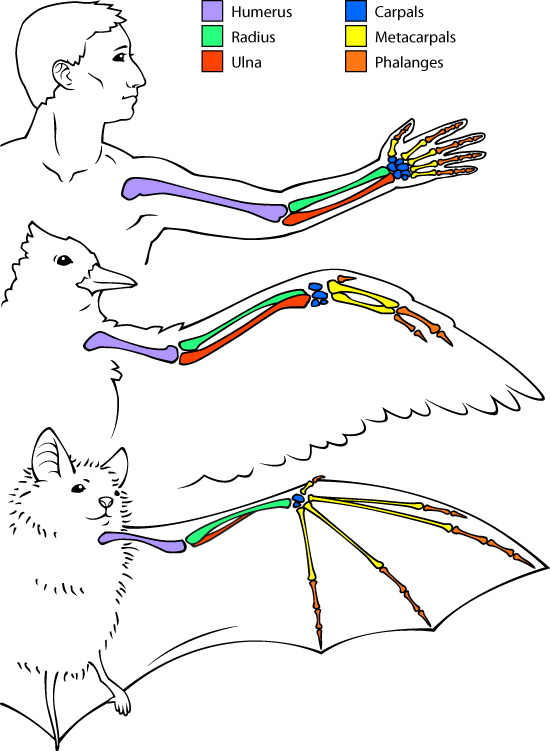
diagram of human arm, bird wing and bat wing

comparison of human, bird and bat limbs source : askabiologist asu edu

Our museum does research on all types of animals. We will feature research on bats, red knots, and moas (now extinct).


Rainforest Alliance

There is an incredible Biodiversity Gallery in our museum that features animal ecosystems and the stories of animals at risk. I came across the Rainforest Alliance website as I was creating the Awesome Animals program (see previous posts). A portion of the site is dedicated to Kids activities, online games, stories and printables.

torotise color page

tortoise color page source : Rainforest Alliance

Take a look:     http://www.rainforest-alliance.org/kids/activities

I particularly like that the coloring pages have information about the species included.


what I did this week – anomalocaris, trilobite, dragon, angler fish

I am drawn to models as adjuncts to museum programming. They can help explain during interpretation plus inspire and generally make a session more memorable. Plastic dinosaur models are my mainstay. I am rarely without one nearby. But they can be expensive and sometimes not really very good representations of the animals. Clay modelling is intriguing but can be messy and presents the challenge of where to put them while they dry. Plus different clays present varying results.

The medium I am most involved in now due to its simplicity and affordability is paper modelling. Here are 4 creations I have made in the past week just by downloading files free off the Internet, printing them out, cutting and pasting.

papercraft animals

clockwise from left : angler fish, anomalocaris, dragon, trilobite photo source : Lorie Pierce

Working with paper has its challenges. Flat models (anomalocaris and trilobite) are easier than shaped ones. There are fewer steps and the precision of gluing is not as critical as with the shaped models (dragon and angler fish).

I learned to not rush the gluing. Do one join at a time and use tweezers to apply pressure. Make sure the seams line up. You can see in this photo that a side seam on the dragon is not glued into the exact location.

dragon paper model

side seam gapes a bit at base of neck photo source : Lorie Pierce

The more often I work with paper, the more I get the feel for it. All these models were printed on cardstock (64 lb) weight.

Now for some close-ups:

anomalocaris

anomalocaris on stand photo source : Lorie Pierce

underside of anomalocaris

underside of anomalocaris photo source : Lorie Pierce

angler fish

angler fish photo source : Lorie Pierce

underside of angler fish

underside of angler fish photo source : Lorie Pierce

trilobite

trilobite photo source : Lorie Pierce

trilobite details

details of trilobite legs and gills photo source : Lorie Pierce

rear of dragon

dragon from rear (a bit out of focus) photo source : Lorie Pierce

Many of the most unique papercraft patterns come from Japan and their instructions are written in Japanese. An addition challenge of these models is to understand from the illustrations, how one is supposed to proceed.

instruction pages

instructions in Japanese photo source : Lorie Pierce

Anyone who has put together a purchase from IKEA will have a head start.


Goods traded along the Silk Road – Peacocks!


According to wiki answers, a lot of goods were traded along the Silk Road in addition to silk itself. Today we will look at a craft based on number 23 – peacocks and their feathers.

What was traded along the Silk Road?

  1. Silk
  2. Porcelain
  3. Tea
  4. Wine
  5. Weapons
  6. Metal work
  7. Jewelry
  8. Horses
  9. Woven goods
  10. Spices
  11. Cloth
  12. Glass
  13. Crystals
  14. Wood
  15. Gold
  16. Silver
  17. Amber
  18. Brassware
  19. Jade
  20. Nuts
  21. Oil
  22. Fruit
  23. Peacock feathers
  24. Sugar
  25. Horses
  26. Camels
  27. Mirrors
  28. Cotton
  29. Kashmir
  30. Buddhist manuscripts
  31. Sculptures
  32. Hemp
  33. Chilies
  34. Salt
  35. Mint
  36. Almonds
  37. Lapis lazuli
  38. Saffron
  39. Dates
  40. Textiles
  41. Lapdogs
  42. Ivory
  43. Dyes
  44. Furs
  45. Incense

http://wiki.answers.com/Q/What_was_traded_along_the_Silk_Road

Here is a peacock using a paper plate, some card stock and feathers. The idea originated from this book:

cover of book titles Kid's Multicultural Art Book

craft ideas by culture photo source : Lorie Pierce


The idea in this book is to use white paper plates and use your thumbprint for the peacock ‘eyes’. Great idea, but too messy for our location.

image from book

peacock with thumbprint 'eyes' photo source: Lorie Pierce

Nosing around in our craft supplies, I came across some pretty blue paper plates. They for the inspiration for this alternative peacock.

parts of peacock craft

it's coming together photo source: Lorie Pierce

placement

where body will be stapled onto the feather display photo source : Lorie Pierce


The body will probably be printed on a green paper and the beak can be coloured gold. Children can draw the feather eyes on with gold or silver markers or perhaps glitter adhesive back foam medallions can be used for the effect.


attachment of feathers to top of head

tape feathers to back of head photo source : Lorie Pierce

Children will pick three feathers in the colours of their choice to tape to the back of the head. In my model, I have made a slit through which the feather ends fit and then are taped down.


Butterfly cuffs

This inexpensive, colourful and quick craft uses a section from any type of empty paper roll as its basic structure.

Here’s how we created butterfly cuffs at our recent event.

butterfly cugg bracelet

butterfly cuff bracelet photo source: Lorie Pierce

Prior to event, the following steps were done at a preparation meeting:

1.slit empty paper rolls lengthwise

2. cut into short lengths, approx. 3.5 to 4 inches long (10 cm)

3. wrap each section with aluminum foil, inside and out

4. staple precut foam butterfly onto centre of wrapped roll segment. Butterflies were purchased 20 pieces for $1.25 at dollar store, in multiple colours.

During the event

5. Child chooses butterfly, precut thorax and pipe cleaner antennae – various colours available

6. Paper backing was peeled of the thorax to expose adhesive. Thorax was pressed onto the middle of the butterfly with pipe cleaner folded in half and stuck between head and cuff. Roll the ends of the pipe cleaner to make knobby ends.

7. Child uses stickers and precut foam shapes to decorate the butterfly. Since all the pieces are adhesive, there is no need for glue.

8. Wear the butterfly in beauty and health.


Grow Chart in situ

The Awesome Animals grow chart was a big hit at the event with children and adults measuring up against ROM animals like the white rhino, the fairy penguin, the moose and the ostrich. The chart could have been a bit narrower to fit on the pillar better.

I would have added more colour too, if I had more time for preparation. Height gradations were in both metres and feet.

grow chart attached to pillar

Awesome Animals Grow Chart photo source: Lorie Pierce

Musings – live versus real

Many times in my museum career, I have been asked by a child. Is that real?

Often they are referring to a taxidermy specimen of a bird or mammal.

My answer is that ‘yes it is real……but it is dead’.

Perhaps it is a developmental consideration. When does a person first learn that something can be real without being alive? Are the concepts of real and alive interchangeable to most children?

At any rate, here are some real animals from the museum….but not all of them are alive.

all photos source: Lorie Pierce

And now it begins

After a couple of weeks in the development stage, the next mini-museum program is fleshed out. With the whole animal kingdom to choose from, I have settled on bees, birds, butterflies, bats and lemurs.  A lot of the decision has to do with the research the museum has ongoing throughout the world. The themes will be migration, pollination, adaptation, communication and museum research.

So far I have identified the following activity areas:
1.  Bees table – honeycomb, Hexbug bees – simulate return to hive – 3 types of bees

2.  Night Animals table – featuring bats, owls, lemurs – touchables & museum research

3.  Animal grow chart – participants measure their height against different animal sizes   –

4.  Bat hat construction table – what bats eat – how they interact with their environment

5.  Birds table – red knots & horseshoe crabs research – bookmarks – ‘Owls on a clothespin’ decoration craft

6.  Butterfly cuff craft table – make wearable arm cuffs of a butterfly or beetle

7. Identify animal tracks station

8. Toddler’s area – books, puppets, jigsaw, dress up

9. Video station with clips of animals and research.

Next step is the prep meeting to prepare materials for the craft tables.
 

Awesome Animals

knit pig

knit piggie photo source: Lorie Pierce

And now to start developing the next mini-museum based on Awesome Animals.

My intention is to focus on the research done at the museum on specific species such as Guyanan bats, red knot birds, ratites (flightless birds), frogs and other amphibians plus animals that are featured in our galleries.

So time for a trip to the galleries with my camera and see where the images lead me.

Simulating animal behaviour

Looking forward to the Awesome Animals mini-museum planned for late October, I’ve started to think of how to show to demonstrate unique aspects of animal behaviour.

Fortunately, there was a sale on Hex Bug habitats and I scooped one up to investigate how it could be used to show insect locomotion. But once it was set up and I had three Nano bugs frantically zooming down the pathways, it came to me that this would be a great model to show communication within a bee hive.

Hex bug habitat with three nano bugs

Hex bug habitat set up to emulate a bee hive photo source : Lorie Pierce

The kit came with two bugs but at least three are needed to show the three types of bees in a colony – worker, drone and queen. You see in this picture a worker bee returning from the outdoors to re-enter the hive. The queen bee and drones are collected in the innermost cell of the hive.

During our event, we will use several bees marked for their specific function. Children can turn them on and see how they communicate within the hive. Supporting graphic and print material will explain the complex and mysterious language of bees while connecting the children back to the live bee colony in the Hands-on Gallery at the museum.

At least, that’s the current plan.

Meanwhile, my spouse and I will test the beehive model at home, much to the surprise and curiosity of our three cats.